The development of rulesets is a long and complex task. It usually requires many hours of work, testing, modifications, etc. Therefore it is very important to protect that work in order not to lose it in circumstances such as power outages, accidental deletions, system crashes or any other eventuality. Backups should be the basic line of protection for any project. As a developer you should make and keep periodic backups of your project files.
This mechanism is usually sufficient for most casual users who are not very familiar with the world of software development, but there is a whole ecosystem of tools specialized in helping programmers manage and maintain their source code. These tools are generically called SCM (Source Control Management), and the most famous and widely used in the world is Git.
Git is a tool with an overwhelming amount of options, but at its most basic use it allows programmers to maintain a repository of snapshots of their source code that can be retrieved at any time. These snapshots (called commits) also allow you to check the changes made over time, and to undo one or more of those changes if they were erroneous.
In this short tutorial you will learn how to start using Git with your projects.
First you must download Git from its official website. It is a free and open source application:
Then run the installer. If you are not sure which options to use keep the default ones. This will install the Git engine, which is usually used from command line, but also a GUI client. For the purpose of this tutorial we will use the GUI client.
Ok, now you are ready to start using Git with your projects. The first step is to open your project with Ruleset Wizard and check the advanced development option in the project options window. You must also fill in a name and email, which are required by Git for commits:

Git options are only informative, you can put whatever you want, but keep in mind that this information is saved in the Git database along with the commits.
Finally save the project and close the Ruleset Wizard. The first effect of this change is that you can now open the project file with a text editor and view its contents in a readable form. This is important for Git to be able to operate correctly with it:
<Ruleset xmlns="http://tempuri.org/Ruleset.xsd">
  <RulesetProperties>
    <Name>Ruleset Wizard Demo</Name>
    <CompilationType>Ruleset</CompilationType>
    <Description>Ruleset Wizard demo project</Description>
    <Author>Psicodelix</Author>
    <Website>www.rulesetwizard.com</Website>
    <Version>1</Version>
    <Release>0</Release>
    <RulesetWizardVersion>0.7.2</RulesetWizardVersion>
    <RulesetList>CoreRPG</RulesetList>
    <LoadOrder />
    <Comments />
    <Announcement>Created with Ruleset Wizard</Announcement>
    <LogoFile />
    <ImportRuleset>CoreRPG</ImportRuleset>
    <AdvancedDevelopment>true</AdvancedDevelopment>
    <GeneratePath />
  </RulesetProperties>
</Ruleset>

<DocumentElement xmlns="http://tempuri.org/Ruleset.xsd">
  <Folders>
    <ID>1</ID>
    <ParentFolderID>0</ParentFolderID>
    <Folder>CharacterSheet</Folder>
  </Folders>
  <Folders>
    <ID>2</ID>
    <ParentFolderID>0</ParentFolderID>
    <Folder>CombatTracker</Folder>
  </Folders>
...
The next step is to create the Git repository in the folder where your project is. By default Git will store in its database all the files that are under that folder and its subfolders, not only the project file but also images, fonts, etc.
To create the repository look for the access to the Git GUI program in your start menu and run it. In the window click on Create New Repository.

Select the folder where your project is located and press Create:

This will create the repository and open the Git GUI interface. We will come back to it later, for the moment you can close it.
The first difference you will notice when you open Ruleset Wizard is that a new button with the Git logo has appeared. This button serves as a shortcut to Save the Project and create a snapshot of it in the Git database (a Commit).
This option should be used sparingly, as too many commits make it more complicated to review changes.

Now it’s time to perform the first commit. Open the project and press the new Save and Commit button, or Ctrl+D. Each time a commit is made, you must enter a comment explaining the changes that have been made. In this case we will enter “Initial Commit”.

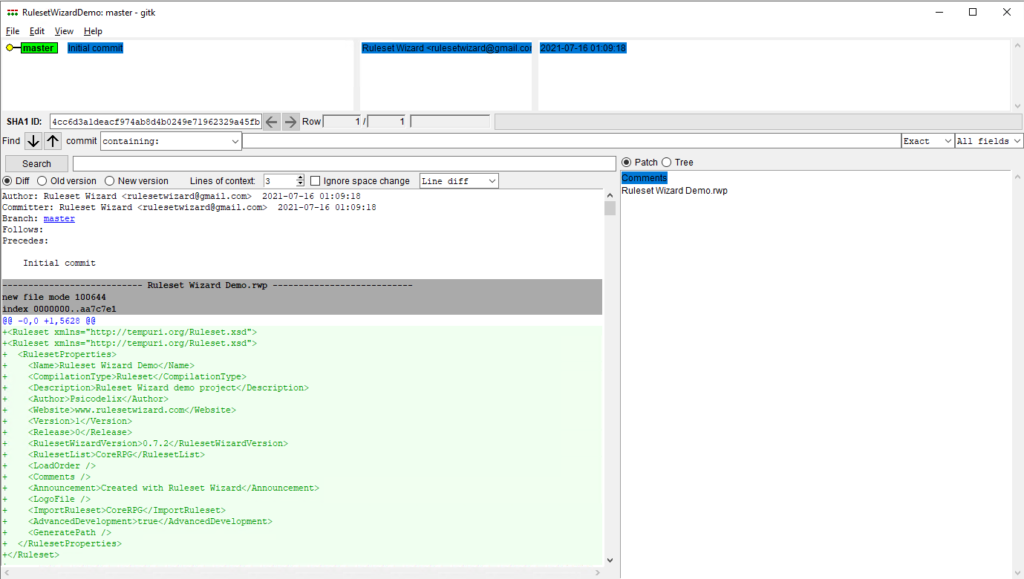
This commit will be the first version of our project for Git. Now you can check this commit in Git. Open the Git GUI, open your repository and click on the menu Repository -> Visualize Master’s History. That displays a window similar to the one below, with information about the current status of the repository:

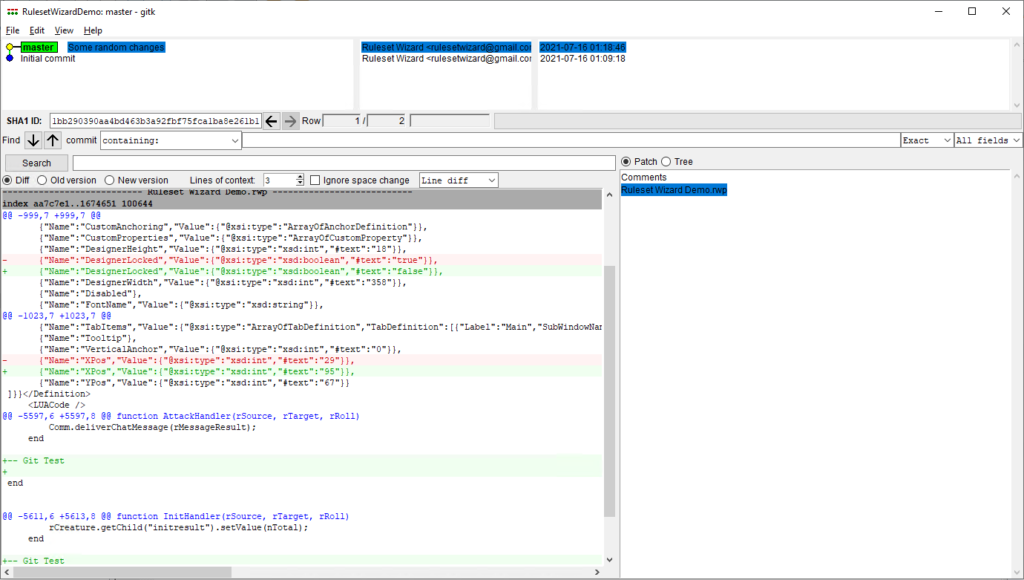
Now make some changes to your project and do another Save and Commit. Then reopen the history window in the Git GUI. This time you can see the changes you have made as a series of inserted and/or deleted lines in the project file:

And you can also make a rollback of the latest changes. First close your project in Ruleset Wizard, then right click on the Commit labeled Initial commit and select the Reset master branch to here option. In the next dialog select the Hard option.


Now when you reopen the project it will be in the state of the initial commit.
Final thoughts
Git is an extremely powerful and complex tool to use to its full potential, and in this tutorial we have only begun to see the surface, but even in its most basic operation it can make a huge improvement when working with our projects.
In addition to what we have seen here Git allows:
- Synchronize our repository with another remote repository (in a cloud provider) to allow multiple people to collaborate on the same project.
- Create different branches of our project to test new features.
On the Internet there are also many tutorials, tools and resources that you can use to keep improving your use of Git.
